photoshop制作logo教程:钢盔
2022-12-26 14:50:43
来源/作者: /
己有:66人学习过
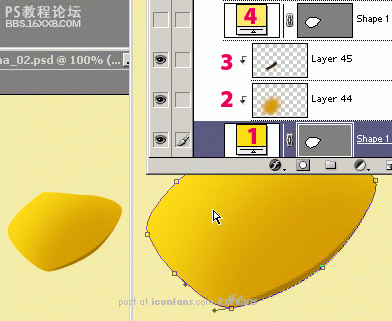
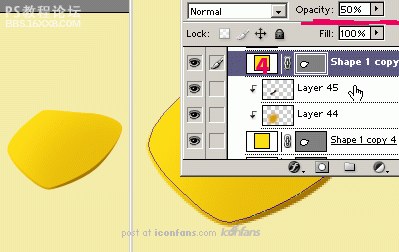
Step 11
Sothat you don´t have to do it all again for layer (4), show this layerwith decreased opacity to 50%. This way, you can still see the shadowfrom the previous layer — how easy. For now, the "peak" is done and youcan continue with the main part of the helmet.
第十一步
这样你不用为图层(4)都再做一遍,将此图层的透明度调整为50%。这样,你仍然可以从之前的图层中看到阴影——多么简单啊。现在为止,“尖尖”已经完成了并且你可以继续头盔的主体部分了。
Step 12
So,unhide the shape of main part and recolor it to the yellow (#FDDB13).Again, create a new layer, group it with previous (Ctrl + Alt + G), andin the marked areas, use big soft brush with darker color. It´s notnecessary to make a very big shadow...
第十二步
主体形状部分取消隐藏并重新着色(#FDDB13),再一次,创建新的图层,与前者编组,并在标记的区域用大的软的更黑的笔刷来绘制。这里没必要做出一个很大的阴影….

, Step 13
Fora better result, you can use the middle streak. Unhide this layer,recolor it to the dark yellow (#AA6F00), and add a layer mask. Intothis mask, draw in the middle with a big soft black brush (as shownbelow), and the layer will be visible only on the sides, not in themiddle.
第十三步
为了一个更好的效果,你可以用一个中间蒙版,取消隐藏这个图层,用暗黄色(#AA6F00)重新着色,并添加一个图层蒙版,在这个蒙版中,在中间用大的软的黑色(就像下图这样)笔刷绘制,这样图层将只有边缘可见,中间不可见。

Step 14
Next,unhide the last layer, the main part of the streak. Recolor it toyellow (#FBD500). In this step, you can also darken the main part ofthe helmet to match the peak.
第十四步
接着,取消隐藏最后的图层,条纹的主体部分。用黄色重新着色(#FBD500)。在这一步,你依然可以调暗钢盔的主体部分来配合条纹。

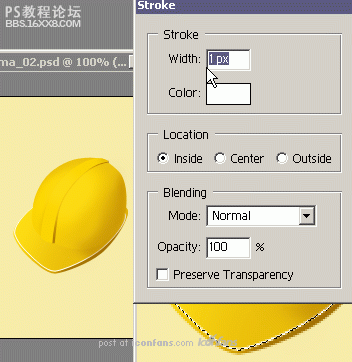
Step 15
Tomake the shape of the helmet more accentuated, use this simple method:draw a one-pixel outline around every shape where the light shines.
Startwith second peak layer. Load the selection (Ctrl-click on the layer),create new layer, and from the Edit menu select the Stroke function.Set the Width to 1px, color white.
第十五步
为了让头盔的阴影更突出,用这个简单的工具:在每个形状的边缘被光照到的地方画一个1像素的白线。从第二个尖图层开始,读取选取(Ctrl+点击图层),创建新图层,从编辑菜单中选择描边功能,设置宽为1像素,白色。
相关推荐

ps cs6设计龙主题LOGO教程

photoshop制作国外彩虹Logo教程

火焰Logo教程

ps制作漂亮清新的LOGO教程

Photoshop制作清凉的水中展示网页

Photoshop制作大气的网页设计主页

阴影教程,超详细的各种阴影的制作方法

Photoshop制作炫酷的PK类网站Banner


