photoshop制作logo教程:钢盔
2022-12-26 14:50:43
来源/作者: /
己有:66人学习过
先看看效果图:

以下是详细的photoshop教程:
Step 1
Asa base, we will use this photograph I took. It's not the greatestphoto, but we can use it to define the basic shapes. The advantage ofthis photo is the fact that it was taken with wide-lens camera, and theperspective is nicely visible. When we talk about icons, perspective isvery often VERY excessive, so this is perfect.
第一步
我们将用我找到的这张图作为基础。这张图不一定是最好的,但是我们可以用它来界定我们要做的头盔的形状。这张图好在它是用广角相机拍摄,而且透视图非常清晰,当我们谈到图标时,透视图是非常重要的,所以这张图非常完美。

Step 2
Sofirstly, cut the helmet out of its background. You can do this usingthe Pen Tool, or your favorite way of extracting images. Then copy thisphoto into a new photoshop document and resize the image to fit theicons dimension — probably 128x128 px. You can use, for example, a newlayer sized 128x128, which will help you to be more accurate. Or youcan, of course, use document sized 128x128 px, but I like to have morespace for drawing.
第二步
首先,将头盔从背景中抠出来,你可以用钢笔工具来完成,或者任何你喜欢的抠图的方法。然后拷贝这张图到一个新的PS文档,调整大小以适合图标的尺寸——一般是128×128像素。
比如你可以将其新建一个图层并将图像调整为128×128像素,或者调整画布大小为128×128像素,但是我比较喜欢更大的空间来绘制。

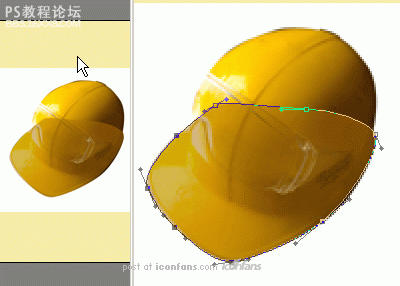
Step 3
Selectthe Pen Tool and step-by-step trace each part of the helmet. We beginwith the visor area. Don´t worry about the color, it's the shape that'simportant. For better accuracy, it's good to decrease the layer´svisibility (Opacity). Simply press the numlock key corresponding to thepercentage opacity you want &mdash for example, 5 for 50% Opacity.When tracing, be sure to draw as a Shape Layer (first icon on theOptions bar), so you can modify this layer in the future.
Notethat because we're just tracing the visor, it doesn't matter that therest isn't accurate around the helmet shape (we'll do that in the nextsteps).
第三步
选择钢笔工具一步一步的描出头盔的每个部分。我们从帽舌开始,不要担心颜色,形状最重要。为了能更加精确,最好调整一下图层透明度,你可以用小键盘来控制,举例来说,5就是50%透明度,当你开始描的时候,确保你画的是形状图层,这样你在后面才能修改它。记住因为我们只是描的帽舌部分,所以被帽子挡住的那部分不必描那么精确。(我们在后面不会用到那部分的)
Step 4
Createthe second part of the "peak" by copying the previous layer (Ctrl + J)and move the selected points upward with the Direct Selection Tool (A).
第四步
通过复制图层(Ctrl+J)以及使用直接选择工具上移选择的点来创建“尖尖”的第二部分。
以下是详细的photoshop教程:
Step 1
Asa base, we will use this photograph I took. It's not the greatestphoto, but we can use it to define the basic shapes. The advantage ofthis photo is the fact that it was taken with wide-lens camera, and theperspective is nicely visible. When we talk about icons, perspective isvery often VERY excessive, so this is perfect.
第一步
我们将用我找到的这张图作为基础。这张图不一定是最好的,但是我们可以用它来界定我们要做的头盔的形状。这张图好在它是用广角相机拍摄,而且透视图非常清晰,当我们谈到图标时,透视图是非常重要的,所以这张图非常完美。
Step 2
Sofirstly, cut the helmet out of its background. You can do this usingthe Pen Tool, or your favorite way of extracting images. Then copy thisphoto into a new photoshop document and resize the image to fit theicons dimension — probably 128x128 px. You can use, for example, a newlayer sized 128x128, which will help you to be more accurate. Or youcan, of course, use document sized 128x128 px, but I like to have morespace for drawing.
第二步
首先,将头盔从背景中抠出来,你可以用钢笔工具来完成,或者任何你喜欢的抠图的方法。然后拷贝这张图到一个新的PS文档,调整大小以适合图标的尺寸——一般是128×128像素。
比如你可以将其新建一个图层并将图像调整为128×128像素,或者调整画布大小为128×128像素,但是我比较喜欢更大的空间来绘制。
Step 3
Selectthe Pen Tool and step-by-step trace each part of the helmet. We beginwith the visor area. Don´t worry about the color, it's the shape that'simportant. For better accuracy, it's good to decrease the layer´svisibility (Opacity). Simply press the numlock key corresponding to thepercentage opacity you want &mdash for example, 5 for 50% Opacity.When tracing, be sure to draw as a Shape Layer (first icon on theOptions bar), so you can modify this layer in the future.
Notethat because we're just tracing the visor, it doesn't matter that therest isn't accurate around the helmet shape (we'll do that in the nextsteps).
第三步
选择钢笔工具一步一步的描出头盔的每个部分。我们从帽舌开始,不要担心颜色,形状最重要。为了能更加精确,最好调整一下图层透明度,你可以用小键盘来控制,举例来说,5就是50%透明度,当你开始描的时候,确保你画的是形状图层,这样你在后面才能修改它。记住因为我们只是描的帽舌部分,所以被帽子挡住的那部分不必描那么精确。(我们在后面不会用到那部分的)
Step 4
Createthe second part of the "peak" by copying the previous layer (Ctrl + J)and move the selected points upward with the Direct Selection Tool (A).
第四步
通过复制图层(Ctrl+J)以及使用直接选择工具上移选择的点来创建“尖尖”的第二部分。
相关推荐

ps cs6设计龙主题LOGO教程

photoshop制作国外彩虹Logo教程

火焰Logo教程

ps制作漂亮清新的LOGO教程

Photoshop制作清凉的水中展示网页

Photoshop制作大气的网页设计主页

阴影教程,超详细的各种阴影的制作方法

Photoshop制作炫酷的PK类网站Banner


